
I’ve never been afraid to paint things, and I rather enjoy it. I’m not sure if it’s because I work my butt off during the school year and take time to write, but the mood that comes from painting is similar to that of sitting around relaxing. I find it to be a total stress reliever, and as a bonus, you get a great product at the end of it.
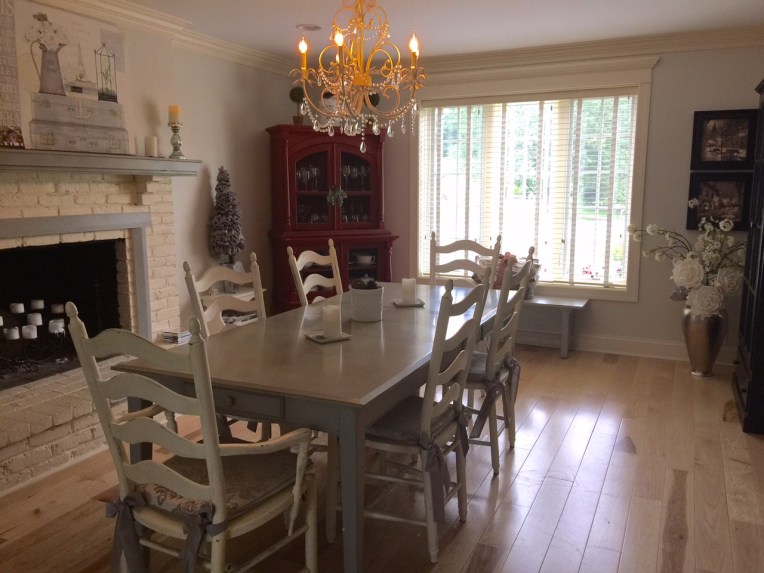
I’ve been wanting to chalk paint my dining room table since we moved into the house. This house has a lot of character and charm, and I didn’t like the way the dining room was feeling. Recently, we added a French door that will lead to the screened-in porch, and we are adding grills to the front window that will help lend some charm. Additionally, we’re going to do some more work to the kitchen which sits adjacent to it. We do not have a separate dining room; we have one dining area in the home, so we wanted it to have that French cottage feel to it. Therefore, after reviewing many videos on YouTube on how to chalk paint, talking to the woman in Annapolis who owns the store where I get the products, and talking to my contractors, I tackled this project. I got a little extra help from my parents today, as my dad came to help finish up the table.

Here’s how I did it for those of you who have asked:
- Pick the colors you want. With Annie Sloan chalk paint, she has many different colors. There are local places that sell the paint. Those places are also helpful and will offer you guidance. They give you a “cheat sheet” on how to paint with it when you purchase. I got mine from The Red Dresser on Mayo Road in Edgewater off Rt. 2 (a little south of Annapolis).
- I decided to use Paris Grey for the table. I cleaned the table first and let it dry completely. I used a mild soap and water.
- I used the Annie Sloan brushes because they can get into difficult areas.
- The paint can be applied to any surface wood; mine was finished with a sheen to it. It went on beautifully.
- Chalk paint dries rather quickly. I applied a second coat about 30 minutes after the first coat. It also has little to no odor. BONUS! Also, it goes a long way. I used about half a can for the project.
- When you touch it when it’s dry, it feels “chalky,” hence the name. It does not feel smooth. To get it smooth, move to the next IMPORTANT step.
- When the second coat was dry, I sanded the whole table. THIS IS THE KEY TO USING CHALK PAINT. The sanding step is imperative. I used a 100-grade sander, and I sanded THE ENTIRE TABLE UNTIL IT WAS SMOOTH. Then, I went along the edges with the sander and distressed edges as if the table had been loving used for years. Go ahead and let yourself distress it. You can always repaint if you make a mistake. But this step is vital to the look and feel of the table.
- After I was done sanding, I toweled off all the chalk dust. Make sure the table is clean and free from the dust before you move to the next step.
- Annie Sloan chalk paint recommends the WAX that goes with it. The wax does leave you with a lovely finish. However, I have read many articles and blogs about the product, and the wax is not recommended for surfaces that could be hot, such as a dining table where hot plates may sit. This is because the wax could melt over time and could affect the look of your table.
- I decided to go with polyurethane with an oil base. While the drying time in between coats can be 12-24 hours, I wanted a finished AND PROTECTIVE finish on the product. Despite the negative comments that the poly can turn yellow over time, I opted for this as my choice. A little yellowing sometimes adds to the look of a piece, and I won’t mind if my French-inspired table and chairs look a little worn and lived in. That’s the whole point of it.
- Right now, my table is sitting in the dining room drying. Today, we sanded the first coat of poly, dusted it, and put another coat on top. This will sit for another 12-48 hours, and then we’ll apply the final coat. Then, one final time, we’ll go over the table with steel wool to make it really smooth. It is coming together beautifully.
- The chairs, which are pictured, only have the first coat (one has a second coat) of chalk paint on it. I have not sanded the chairs or distressed them yet. But I will. Bynext week, I’ll show you the entire, completed project.
That’s how I did it. If you have any questions, feel free to post your comments and I’ll try to help answer them for you.
Best of luck on your chalk painting projects.


Leave a Reply to Steph’s Scribe/Stephanie VerniCancel reply